The Ultimate List of Keyboard Shortcuts for Lightroom Users
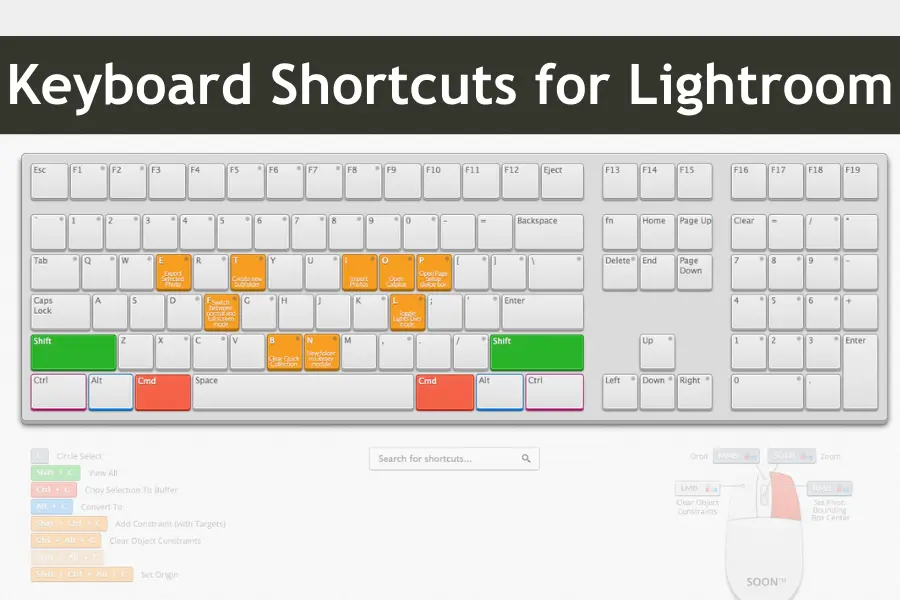
One of the biggest challenges in photo and video editing is managing time efficiently. The more time you spend on basic tasks, the less time you have for creativity. This is where Keyboard Shortcuts for Lightroom come into play. These shortcuts let you quickly access tools, make adjustments, and navigate your workspace without lifting your hands from the keyboard. The result? A faster, smoother editing process that allows you to focus on what matters—creating beautiful content.
By mastering these shortcuts, you can drastically reduce the time spent on editing while still achieving professional-quality results. In this guide, we’ll walk you through the most essential Lightroom shortcuts that will transform the way you edit, allowing you to focus more on creativity and less on the technicalities.
| Task | Shortcut (Windows) | Shortcut (Mac) | Description |
|---|---|---|---|
| Import Photos | Ctrl + Shift + I | Cmd + Shift + I | Opens the Import dialog box to add new photos to your library. |
| Export Photos | Ctrl + Shift + E | Cmd + Shift + E | Opens the Export dialog box to save edited photos. |
| Switch to Library Module | G | G | Switches to the Library module for organizing and managing photos. |
| Switch to Develop Module | D | D | Switches to the Develop module for photo editing. |
| Create Virtual Copy | Ctrl + ‘ (apostrophe) | Cmd + ‘ (apostrophe) | Creates a virtual copy of the selected photo for alternative edits. |
| Apply Auto Tone | Ctrl + Shift + U | Cmd + Shift + U | Automatically adjusts the exposure and tone of the photo. |
| Merge to HDR | Ctrl + Alt + Shift + E | Cmd + Option + Shift + E | Merges selected photos into an HDR image. |
| Merge to Panorama | Ctrl + Alt + Shift + M | Cmd + Option + Shift + M | Merges selected photos into a panorama. |
| Crop Photo | R | R | Opens the Crop tool for adjusting the composition of the photo. |
| Toggle Before/After View | \ (Backslash) | \ (Backslash) | Shows the photo before and after edits for comparison. |
Getting Started with Keyboard Shortcuts for Lightroom
Keyboard Shortcuts for Lightroom can be a game-changer, but knowing where to start can feel overwhelming. Let’s break it down into simple steps so you can begin using these shortcuts immediately.
Overview of How to Enable and Customize Keyboard Shortcuts for Lightroom
Lightroom comes with a set of default keyboard shortcuts that are ready to use right out of the box. However, if you want to tailor these shortcuts to fit your editing style, Lightroom allows you to customize them. To access this feature, go to the Edit menu (or Lightroom menu on Mac), then select Keyboard Shortcuts. Here, you can view, edit, and assign new shortcuts to any frequently used function. This customization ensures that the shortcuts are intuitive and convenient for your workflow.
Quick Guide to Accessing the Shortcut Reference Sheet Within Lightroom
For quick access to all available Keyboard Shortcuts for Lightroom offers a built-in reference sheet. Press Ctrl + / (Windows) or Cmd + / (Mac) while in Lightroom, and a comprehensive list of shortcuts will appear on your screen. This reference sheet is a handy tool, especially when learning new shortcuts. You can keep it open on a secondary screen or print it out for easy access until you’ve memorized the ones you use most.
Commonly Used Shortcuts for Beginners to Get Started
If you’re new to Lightroom or just starting with shortcuts, here are some essential ones to help you get started:
- G: Switch to Grid view, where you can see all your photos at a glance.
- D: Jump straight to the Develop module to edit your selected photo.
- R: Open the Crop tool to adjust the framing of your image quickly.
- F: Toggle Full-Screen mode to view your photo without any distractions.
- L: Enter Lights Out mode, which dims the surrounding interface, helping you focus on your photo.
- P: Pick a photo as a favorite or mark it as a selected image.
- X: Reject a photo you don’t want to keep.
- Z: Zoom in and out of your photo to closely examine the details.
These shortcuts are easy to remember and incredibly useful for speeding up your workflow as you begin your journey with Lightroom. The more you use them, the more natural they’ll feel, and before you know it, you’ll be editing photos like a pro.
Personal Experience or Anecdote About How Shortcuts Improved Your Editing Speed
When I first started using Lightroom, I would spend hours on a single photo, meticulously going through each step one click at a time. It was exhausting and often led to frustration. Then, I discovered keyboard shortcuts. The difference was night and day. Suddenly, tasks that used to take minutes could be done in seconds. My editing speed doubled, and I enjoyed the process much more. Shortcuts didn’t save me time—they transformed my workflow, making me a more efficient and confident editor. Now, I can’t imagine editing without them.
Time Savings with Shortcuts
Using keyboard shortcuts can save up to 30% of the time spent on repetitive tasks in Lightroom. For example, tasks like toggling between modules or applying basic edits that normally take several clicks can be done instantly with shortcuts.
Essential Keyboard Shortcuts for Lightroom Classic
This approach saves time and makes the entire editing process smoother, more intuitive, and, ultimately, more enjoyable. By incorporating Keyboard Shortcuts for Lightroom workflow, you’ll become faster and more focused, allowing you to bring your creative visions to life with greater ease.
Lightroom Classic has features; mastering the essential keyboard shortcuts can drastically improve your efficiency. Let’s dive into the most important shortcuts that will help you speed up various editing tasks.
Importing & Exporting Photos
Getting photos in and out of Lightroom efficiently is crucial, especially when working with large batches of images.
- Ctrl + Shift + I (Windows) / Cmd + Shift + I (Mac): Open the Import dialog to bring new photos into Lightroom.
- Ctrl + Shift + E (Windows) / Cmd + Shift + E (Mac): To export selected photos to your desired format and location, press Ctrl + Shift + E.
- Ctrl + Shift + N (Windows) / Cmd + Shift + N (Mac): This command creates a new collection, allowing you to organize your imports right from the start.
These shortcuts help you quickly manage the flow of images into and out of Lightroom, saving time and ensuring you stay organized.
Navigating Modules
Navigating between Lightroom’s modules can be time-consuming if you constantly reach for your mouse. These shortcuts make it a breeze:
- G: Switch to the Library module to view and organize your photos.
- D: Jump to the Develop module, where the magic of editing happens.
- E: Enter the Loupe view within the Library module for a closer look at a single image.
- M: Access the Map module to geo-tag your photos based on location.
- S: Open the Slideshow module to create quick presentations of your images.
- T: Go to the Print module to set up and print your photos.
- W: Open the Web module to prepare your images for online galleries.
These shortcuts allow you to move seamlessly between different stages of your workflow, keeping your focus on editing rather than on navigating.
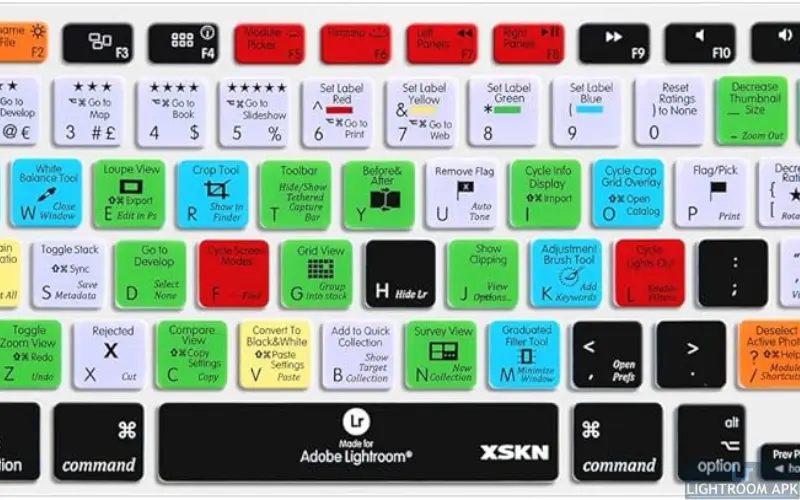
Basic Editing (Exposure, Contrast, etc.)
Basic edits are the foundation of any photo enhancement process. Mastering these shortcuts will help you make quick adjustments without slowing down:
- R: Open the Crop tool to quickly adjust the composition.
- Ctrl + Shift + U (Windows) / Cmd + Shift + U (Mac): Apply Auto Tone to give your photo a balanced exposure.
- Ctrl + ‘ (apostrophe) (Windows) / Cmd + ‘ (apostrophe) (Mac): Create a virtual copy of your photo to try different edits without altering the original.
- ** (Backslash): Toggle between your photo’s original and edited versions to see before-and-after comparisons.
- Ctrl + Z (Windows) / Cmd + Z (Mac): Undo your last action if you’re unhappy with the adjustment.
These shortcuts make it easy to adjust exposure, contrast, and other basic settings, enabling you to create stunning edits in less time.
Advanced Editing (Masks, Brushes, etc.)
For more complex edits, Lightroom offers powerful tools like masks and brushes. Here are the shortcuts you need to use them effectively:
- K: Open the Adjustment Brush to apply localized edits to specific areas of your photo.
- M: Access the Graduated Filter to make gradual adjustments across a portion of your image.
- Shift + M: Activate the Radial Filter to apply edits within a circular or elliptical area.
- Q: Use the Spot Removal tool to eliminate blemishes and unwanted objects from your photo quickly.
- O: Toggle the overlay when using masks to see the areas affected by your adjustments.
These shortcuts are essential for fine-tuning your images, allowing you to make precise edits without interrupting your workflow.
Organizing and Managing Photos
Efficient photo management is crucial, especially when dealing with large libraries. These shortcuts will help you stay organized:
- P: Flag a photo as a pick, marking it as one of your favorites.
- X: Mark a photo for deletion by flagging it as rejected.
- Ctrl + B (Windows) / Cmd + B (Mac): Open the Book module to create a photo book with your selected images.
- Ctrl + Alt + 0 (Windows) / Cmd + Option + 0 (Mac): Add your selected photos to a Quick Collection for easy access later.
- Ctrl + G (Windows) / Cmd + G (Mac): Group selected photos into a stack to keep similar images together.
These shortcuts streamline organizing your photos, making finding and managing your best shots easier.
Viewing and Comparing Photos
When selecting the best images, Lightroom offers several views and comparison tools. Here’s how to access them quickly:
- C: Enter Compare view to see two photos side by side, helping you choose the best version.
- N: Switch to Survey view to compare multiple photos and narrow your selections.
- F: Toggle Full-Screen mode to view your photo without distractions, ideal for final evaluations.
- L: Engage Lights Out mode, which dims the interface so that it can focus entirely on the image.
- Spacebar: Zoom in on your photo for a detailed view, then press it again to zoom out.
These shortcuts help you efficiently review and compare your photos, ensuring you make the best selections for editing and exporting.
By mastering these essential Keyboard Shortcuts for Lightroom Classic, you can navigate the software more quickly, make edits more efficiently, and produce better results in less time. Whether importing photos, making basic adjustments, or organizing your library, these shortcuts will transform how you work in Lightroom.
Commonly Used Shortcuts
According to Adobe, the most frequently used Lightroom shortcuts by professional editors include G (Grid View), D (Develop Module), and R (Crop Tool). These shortcuts alone account for nearly 50% of shortcut usage in Lightroom Classic.
Keyboard Shortcuts for Lightroom Mobile
Lightroom Mobile is a powerful tool that brings professional photo editing capabilities to your smartphone or tablet. While it offers a streamlined desktop experience, mastering keyboard shortcuts on mobile can greatly enhance your efficiency and productivity, especially when editing on the go.
Overview of Lightroom Mobile and the Importance of Knowing Shortcuts on Mobile Devices
Lightroom Mobile allows you to edit photos with the same quality and precision as the desktop version but in a more portable format. Whether you’re adjusting exposure, applying filters, or fine-tuning details, the app provides a range of tools that can be accessed with just a few taps. However, knowing the right shortcuts can make your editing process even faster, allowing you to produce high-quality edits without constantly navigating through menus. For users who often edit on mobile devices, these shortcuts are invaluable for maintaining a quick and efficient workflow.
List of Essential Shortcuts Specifically for Mobile Users
While Lightroom Mobile doesn’t offer the extensive keyboard shortcuts found on the desktop version, it does provide a few essential gestures and commands that can significantly speed up your workflow:
- Double-tap on the screen: Quickly zoom in on a photo to check details, then double-tap again to zoom out.
- Two-finger tap: You can toggle between your photo’s original and edited version, allowing you to see before-and-after comparisons instantly.
- Swipe up or down: Adjust exposure quickly by swiping up to increase or down to decrease the brightness.
- Pinch to zoom: Use this common gesture to zoom in and out of your photo for more detailed editing.
- Swipe left or right: Navigate between editing tools without returning to the main menu.
These gestures are simple yet powerful, enabling you to edit efficiently on a mobile device without sacrificing control over your adjustments.
How Mobile Shortcuts Differ from the Desktop Version
While both Lightroom Mobile and the desktop version share the same core editing tools, the way you access these tools can differ significantly. The desktop version relies heavily on keyboard shortcuts, while the mobile version uses gestures and taps designed for touchscreens. This makes mobile editing more intuitive but requires a different approach to efficiency. Unlike the desktop version, where keyboard shortcuts can be customized, Lightroom Mobile’s gestures are predefined, focusing on simplicity and ease of use.
However, understanding these mobile-specific shortcuts can bridge the gap between desktop and mobile editing, allowing you to transition seamlessly between devices without losing productivity.
How to Cancel Lightroom Subscription on Android, iOS & Desktop
Customizing Your Keyboard Shortcuts for Lightroom
While Lightroom Mobile doesn’t currently support custom shortcuts, the desktop version offers extensive customization options, allowing you to tailor the editing experience to your workflow.
Step-by-Step Guide on How to Customize and Create Your Shortcuts
Customizing your Keyboard Shortcuts for Lightroom is straightforward and greatly enhances editing efficiency. Here’s how you can do it:
- Open Lightroom and navigate to the Edit menu (or Lightroom menu on Mac).
- Select Keyboard Shortcuts from the dropdown menu.
- In the Keyboard Shortcuts panel, you’ll see a list of all available commands and their associated shortcuts.
- To customize a shortcut, click on the existing shortcut and press the new key combination you want to assign.
- If a shortcut is already in use, Lightroom will notify you, allowing you to choose a different combination.
- Once you’ve made your changes, click Save to apply the new shortcuts.
Customizing shortcuts allows you to prioritize the tools and actions you use most frequently, making them quicker to access.
Best Practices for Customizing Shortcuts to Suit Your Editing Style
When customizing shortcuts, consider your editing habits and which tools you use most often. Here are a few tips:
- Group similar actions: Assign shortcuts for related tools near each other on the keyboard. For example, keep exposure, contrast, and white balance adjustments on neighboring keys.
- Prioritize efficiency: Focus on shortcuts for actions you perform frequently, such as toggling between before-and-after views or switching between modules.
- Test and refine: After customizing your shortcuts, edit with them to ensure they feel natural and improve your workflow. Adjust as needed.
Custom shortcuts should streamline your editing process, not complicate it, so take the time to fine-tune them to your needs.
Learning Curve
It takes an average of 7 days of regular use for a new Lightroom user to become comfortable with the top 10 essential shortcuts, significantly improving their editing speed and efficiency.
Tips for Remembering Customized Shortcuts
Remembering your customized shortcuts can be challenging at first, but with practice, they’ll become second nature. Here’s how to help the process along:
- Create a cheat sheet: Write down your customized shortcuts and keep them handy while getting used to them. Stick it on your monitor or keep a digital version on your desktop.
- Practice regularly: The more you use your shortcuts, the faster you memorize them. Spend time editing daily to reinforce muscle memory.
- Start small: Customize a few essential shortcuts rather than changing everything simultaneously. This gradual approach makes it easier to remember each new shortcut.
By following these tips, you’ll quickly become comfortable with your customized shortcuts, making your Lightroom editing process faster and more enjoyable.
Top 10 Keyboard Shortcuts for Lightroom for Advanced Users
As you become more proficient with Lightroom, advanced keyboard shortcuts can take your editing efficiency to the next level. These shortcuts are designed for seasoned users who want to streamline complex tasks and get the most out of Lightroom’s powerful features.
Highlight Advanced Shortcuts for Seasoned Lightroom Users
Here are the top 10 advanced Keyboard Shortcuts for Lightroom that every experienced user should know:
- Shift + Tab: Hide or show all panels, giving you a full-screen workspace to focus solely on your photo.
- Ctrl + Alt + Shift + E (Windows) / Cmd + Option + Shift + E (Mac): Merge selected photos into an HDR image.
- Ctrl + Alt + Shift + M (Windows) / Cmd + Option + Shift + M (Mac): Merge selected photos into a panorama.
- Ctrl + Alt + Shift + R (Windows) / Cmd + Option + Shift + R (Mac): Merge selected photos into an HDR panorama.
- Ctrl + Shift + H (Windows) / Cmd + Shift + H (Mac): Automatically align images for panorama or HDR merges.
- Alt + Ctrl + Shift + P (Windows) / Cmd + Option + Shift + P (Mac): Open the Print module and print with the last used settings.
- Alt + Shift + R (Windows) / Option + Shift + R (Mac): Toggle between different crop overlays, like the rule of thirds or golden ratio.
- Shift + O: Cycle through different mask overlay colors in the Develop module.
- Alt + Shift + 2 (Windows) / Option + Shift + 2 (Mac): Show the Before/After view in a side-by-side comparison.
- Ctrl + Alt + 2 (Windows) / Cmd + Option + 2 (Mac): To apply or manage presets, open the Develop Presets folder directly.
These shortcuts help you manage multiple images, apply edits quickly, and view your work more efficiently, especially with advanced editing techniques.
How to Reset Shortcuts if Something Goes Wrong
If all else fails and you need to reset your shortcuts to their default settings:
- Go to the Edit menu (or Lightroom menu on Mac) and select Preferences.
- In the Preferences window, navigate to the General tab.
- Click on Reset All Preferences to return all settings, including keyboard shortcuts, to their defaults.
Alternatively, you can manually reset individual shortcuts by visiting the Keyboard Shortcuts panel and restoring defaults for specific commands.
Resetting your shortcuts can be a quick fix for resolving conflicts or mistakes, ensuring you can confidently continue editing.
Conclusion
Mastering Keyboard Shortcuts for Lightroom isn’t just about working faster—it’s about transforming how you edit. These shortcuts allow you to focus more on creativity and less on the technical aspects, making the editing process smoother and more enjoyable.
Incorporating these shortcuts into your daily workflow takes practice, but the benefits are well worth the effort. Start by learning the basics, and gradually add more advanced shortcuts as you become comfortable. The more you use them, the more natural they’ll feel, ultimately becoming second nature in your editing routine.
Keyboard shortcuts can elevate your editing efficiency, enabling you to achieve professional results quickly. By integrating these shortcuts into your workflow, you’ll save time and enhance your overall editing experience, making every session in Lightroom more productive and enjoyable.

