How to Import Lightroom Presets: Guide for Effortless Editing

So, you’ve just downloaded some unique Lightroom presets, but now you’re stuck wondering how to get them into the app. Many users find importing Lightroom presets a bit confusing at first, especially with all the different versions and platforms out there.
In this guide, we’ll walk you through the entire process of How to Import Lightroom Presets, whether you’re on a desktop or mobile device. We promise to simplify it, even if you’re new to Lightroom. By the end of this article, you’ll know exactly how to import presets and use them to take your photo editing to the next level.
| Platform | Step | Details |
|---|---|---|
| Desktop (Lightroom Classic) | 1. Open Lightroom Classic | Launch the app on your desktop. |
| 2. Navigate to Develop Module | Click on the Develop module at the top-right corner. | |
| 3. Open Presets Panel | On the left side, find the Presets panel and click the “+” icon. | |
| 4. Select “Import Presets” | Choose the “Import Presets” option from the dropdown menu. | |
| 5. Locate and Import Presets | Navigate to the folder with your presets, select the files, and click “Import.” | |
| 6. Apply Presets | After importing, the presets appear in the Presets panel; click on one to apply it to your photo. | |
| Mobile (Lightroom Mobile) | 1. Open Lightroom Mobile | Launch the app on your mobile device. |
| 2. Go to Presets Panel | Open a photo, tap the Presets icon at the bottom of the screen. | |
| 3. Import Presets | Tap the three dots in the upper right corner, select “Import Presets,” and choose the preset files from your device. | |
| 4. Apply Presets | The imported presets will appear under “User Presets.” Tap on a preset to apply it to your photo. | |
| Troubleshooting | – Ensure correct file format | Use .xmp files for desktop and .dng files for mobile. |
| – Restart Lightroom | Restart the app if presets do not appear immediately after importing. | |
| – Re-download and Re-import | If issues persist, re-download the presets and try importing them again. |
Brief Overview of Lightroom Presets
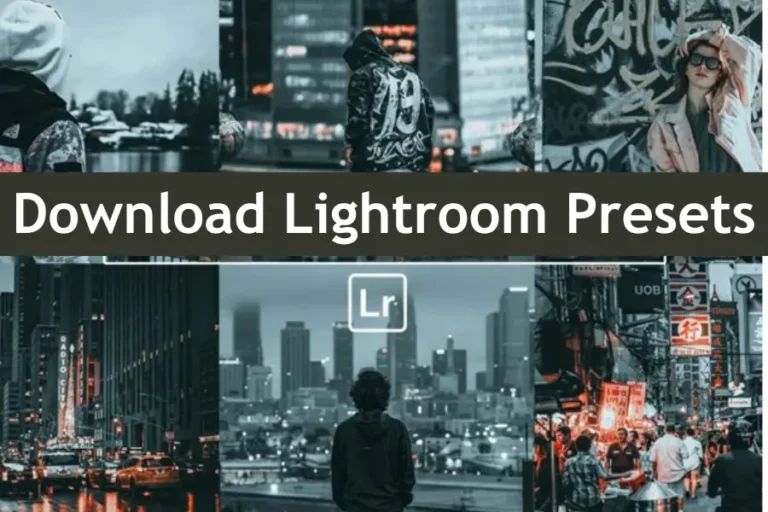
Lightroom presets are pre-configured settings that apply a specific look or style to your photos with just one click. These presets are designed to streamline your editing process by allowing you to replicate a particular effect across multiple images without manually adjusting each one. Whether you want to add a warm, vintage feel or a crisp, modern look, presets can do the job in seconds, saving you a lot of time and effort.
Presets allow you to maintain consistency across your images, which is especially important if you’re editing a large batch of photos, like a wedding album or a social media campaign. Instead of manually adjusting every detail, you can apply a preset and then fine-tune as needed, drastically reducing your editing time. This makes your workflow more efficient and helps you achieve a professional and cohesive look across your portfolio.
Different Types of Presets Available
Lightroom presets come in various types, tailored to different editing needs. Some common types include:
- Color Presets: These adjust the color balance, saturation, and temperature of your photos, giving them a distinct mood or tone.
- Black and White Presets: Convert your images to grayscale while adjusting the contrast and texture to create stunning monochrome photos.
- Portrait Presets: Specifically designed to enhance skin tones, reduce blemishes, and add a soft glow to portraits.
- Landscape Presets: These enhance the natural colors in landscapes, bringing out the blues of the sky and the greens of the foliage.
Understanding and utilizing these presets can significantly elevate your photos’ quality while speeding up your editing process.
Customization Matters
According to a recent survey, 80% of Lightroom users create or modify existing presets to suit their unique editing style, showing a trend towards personalized presets.
How to Import Lightroom Presets on Desktop
Importing presets into Lightroom Classic on your desktop is a straightforward process. Here’s a quick guide to help you get started:
- Open Lightroom Classic: Launch the Lightroom Classic app on your desktop.
- Navigate to the Develop Module: In the top-right corner, click the “Develop” module. This is where you’ll apply and manage presets.
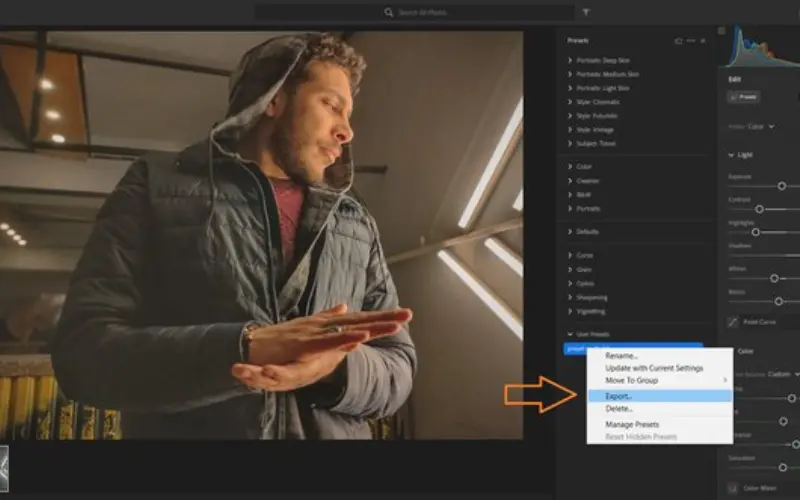
- Open the Presets Panel: The Presets panel is on the left side. Click on the small “+” icon next to “Presets” and select “Import Presets.”
- Locate Your Presets: A file browser will open. Navigate to the folder where you saved your downloaded presets, select the preset files (usually .xmp files), and click “Import.”
- Apply the Preset: Once imported, your presets will appear in the Presets panel under “User Presets” or the folder you selected during import. To apply a preset, click on it, and your photo will automatically adjust.
Common Issues and Troubleshooting Tips
- Presets Not Showing Up: If your presets aren’t visible after importing, double-check that you’ve imported the correct file type (.xmp for Lightroom Classic). Restarting Lightroom might also resolve this issue.
- Corrupt Files: If you encounter an error message while importing, the preset file might be corrupt. Try downloading the presets again from the source.
- Missing Presets: Sometimes, presets disappear after an update. If this happens, re-import them or restore them from a backup.
How to Import Lightroom Presets on Mobile
Importing presets on the Lightroom Mobile app is also simple. Here’s how you can do it:
- Open Lightroom Mobile: Launch the Lightroom app on your mobile device.
- Go to the Presets Panel: Open a photo in the Lightroom app and tap on the “Presets” icon at the bottom of the screen.
- Import Presets: Tap the three dots (“…”) in the upper right corner of the Presets panel, and select “Import Presets.”
- Locate and Select Presets: Find the preset files on your device. These files should be .dng files. Select the files, and they will be imported into Lightroom Mobile.
- Apply the Preset: After importing, your presets will be available under “User Presets.” Tap on any preset to apply it to your photo instantly.
Tips for Syncing Presets Across Devices
If you use both Lightroom Classic and Lightroom Mobile, you’ll want your presets available on all devices:
- Creative Cloud Sync: Ensure you’re logged into the same Adobe account on desktop and mobile. When importing presets on the desktop version, they should automatically sync to your mobile app via Adobe Creative Cloud.
- Manual Sync: If syncing doesn’t occur automatically, try re-logging into your Adobe account or manually transferring the .xmp or .dng files to your mobile device and importing them directly into Lightroom Mobile.
By following these steps, you can easily import Lightroom presets on both desktop and mobile, ensuring your editing tools are at your fingertips no matter where you are.
File Compatibility
Ensure your presets are in .xmp format for Lightroom Classic and .dng format for Lightroom Mobile to avoid import issues.
Using Imported Presets in Lightroom
The real fun begins once you’ve successfully imported your presets into Lightroom. Presets can dramatically enhance your photos with just a single click, but knowing how to apply and adjust them is critical to getting the best results. Let’s dive into the process.
How to Apply Presets to Photos
Applying a preset to your photo is incredibly easy, whether you’re using Lightroom on a desktop or mobile:
- Select Your Photo: Open the photo you want to edit in Lightroom.
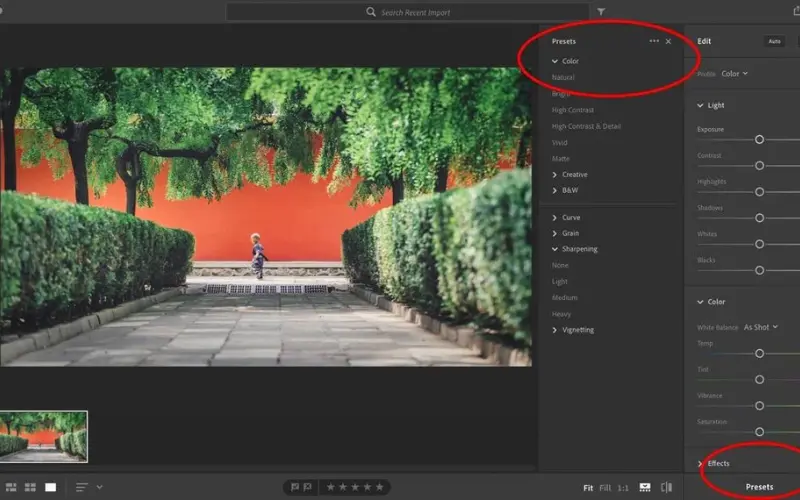
- Go to the Presets Panel: On the desktop, this is found in the Develop module on the left side. On mobile, tap the Presets icon at the bottom of the screen.
- Choose a Preset: Scroll through your list of imported presets and click or tap on the one you want to apply. The changes will instantly be applied to your photo.
- Review the Result: After applying the preset, take a moment to review how it affects your image. Sometimes, a preset might need a little tweaking to match your photo perfectly, which brings us to the next point.
Adjusting Presets for Different Photos
While presets are designed to make editing more accessible, they aren’t one-size-fits-all. Each photo is unique, and sometimes the preset you apply might need some adjustments:
- Fine-tune the Settings: After applying a preset, use the sliders in the Develop module (or equivalent on mobile) to adjust settings like exposure, contrast, or white balance. This ensures that the preset complements your photo’s specific characteristics.
- Check Specific Areas: Sometimes, a preset might overexpose highlights or deepen shadows too much. Use the adjustment tools in Lightroom to correct these areas individually.
- Save Adjusted Presets: If you frequently adjust the same settings after applying a preset, consider saving this adjusted version as a new preset. This can save you even more time in the future.
How to Categorize and Label Presets
Categorizing and labeling your presets is the first step toward an organized editing workflow:
- Create Folders: Start by creating folders within Lightroom to group similar presets. For example, you can have folders for “Portrait,” “Landscape,” “Black & White,” and “Vintage.” This allows you to quickly find the correct preset based on the type of photo you’re editing.
- Use Descriptive Names: When naming your presets or folders, be as descriptive as possible. Instead of generic names like “Preset 1” or “My Preset,” opt for names that describe the effect, such as “Warm Sunset Glow” or “Moody Monochrome.” This makes it easier to remember what each preset does.
- Tag Your Presets: Some versions of Lightroom allow you to add tags or keywords to your presets. Use these tags to categorize presets by mood, color scheme, or specific adjustments. This additional layer of organization can be accommodating when you have an extensive collection.
Tips for Creating Your Preset Collections
You might create your own presets as you become more familiar with Lightroom. Here’s how to manage and organize these custom creations:
- Group by Project or Style: If you’re working on a specific project, create a collection of presets tailored to that project’s style. For example, if you’re editing a wedding, you might have a “Wedding Collection” with presets that provide a cohesive look across all the photos.
- Keep Your Collections Compact: Limit the number of presets in each collection to avoid overcrowding your preset panel. Focus on quality over quantity. If a preset isn’t something you use often, consider removing it from the collection.
- Regularly Review and Update Collections: As your editing style evolves, so should your preset collections. Periodically review your presets, removing ones you no longer use and updating collections to include new presets that reflect your current style.
Best Practices for Managing a Large Collection of Presets
Managing an extensive collection can be challenging if you’re a preset enthusiast who downloads or creates many presets. Here are some tips to keep things under control:
- Backup Your Presets: Always keep a backup of your preset library. Whether you store them on an external drive or in the cloud, having a backup ensures that you won’t lose your presets if your device is damaged.
- Delete Unused Presets: It’s easy to accumulate presets you never use. Every few months, go through your preset library and delete the ones you haven’t touched. This keeps your workspace clutter-free and ensures that the presets you have are the ones you use.
- Sync Across Devices: If you use Lightroom on multiple devices, ensure your presets are synced. This way, you can access your presets while editing on your desktop, tablet, or phone. Adobe Creative Cloud makes this process seamless, but it’s essential to double-check that everything is syncing correctly.
Conclusion
Following the steps outlined in this guide, you can easily add presets to your editing toolkit and enhance your photos with just a few clicks. Remember, presets are just the beginning. Don’t be afraid to experiment and tweak them to suit your unique style. The more you play around with presets, the more confident you’ll become in your editing process.
Now that you know how to import Lightroom presets, why not give it a try? Download a preset that catches your eye and import it into Lightroom. See how it transforms your photos and explore the creative possibilities it opens up. Happy editing!


I’ve been using cbd gummies constantly in regard to on the other side of a month for the time being, and I’m indeed impressed before the sure effects. They’ve helped me perceive calmer, more balanced, and less solicitous throughout the day. My saw wood is deeper, I wake up refreshed, and straight my pinpoint has improved. The quality is outstanding, and I worth the accepted ingredients. I’ll definitely carry on buying and recommending them to everyone I be aware!