How to Fix Blurry Photos in Lightroom for Stunning Results

How to Fix Blurry Photos in Lightroom? You snap what you think is the perfect photo, only to discover it’s annoyingly blurry. Blurry photos can be frustrating, especially when capturing important moments, Whether due to a shaky hand, a moving subject, or just a slight misfocus. But don’t worry; if you’ve ever found yourself staring at a less-than-crisp image, you’re not alone.
With Adobe Lightroom, you can easily fix blurry photos and bring them back to life. Lightroom offers powerful yet intuitive tools that allow you to sharpen your images, enhance details, and make your photos look as clear as you imagined. In this guide, we’ll walk you through the exact steps to fix blurry photos in Lightroom so you can save your images and keep those memories sharp.
| Step | Tool/Feature | Description |
|---|---|---|
| 1. Identify the Blur Type | N/A | Determine if the blur is motion blur, out-of-focus, or camera shake. |
| 2. Use Sharpening Tool | Sharpening (Detail Panel) | Increase the Amount, adjust Radius and Detail to enhance edges. |
| 3. Apply Masking | Masking (Detail Panel) | Use Masking to target specific areas for sharpening, avoiding smooth regions. |
| 4. Reduce Motion Blur | Clarity, Texture (Basic Panel) | Use Clarity and Texture sliders to enhance details and reduce motion blur. |
| 5. Selective Sharpening | Radial Filter, Adjustment Brush | Sharpen specific areas using these tools for precise control. |
| 6. Noise Reduction | Noise Reduction (Detail Panel) | Reduce noise introduced by sharpening, especially in darker areas. |
| 7. Export Settings | Export Dialog | Set appropriate resolution, format, and output sharpening based on usage. |
Understanding Photo Blur
Before using the tools, it’s essential to understand what causes photo blur. Blur can occur for various reasons, and knowing the type of blur is the first step in fixing it. Not all blur is the same, requiring a different approach in Lightroom.
Common Causes of Blurry Photos
Blurry photos are often the result of one or more of the following:
- Camera Shake: The camera moves slightly while the shutter is open, causing the entire image to blur.
- Motion Blur: The photo’s subject moves faster than the camera’s shutter speed, leading to a streaky effect.
- Out-of-Focus: The camera focuses on the wrong part of the image, leaving the intended subject blurry.
- Low Light: Poor lighting conditions can force the camera to use a slower shutter speed, increasing the chances of blur.
Types of Blur in Photography
Blur can manifest in different forms, each with its unique characteristics:
- Motion Blur: Often appears as streaks or trails behind moving objects. It’s caused by a slow shutter speed combined with a fast-moving subject.
- Out-of-focus blur: This blur occurs when the camera’s focus is not aligned with the subject. It results in a soft or hazy appearance around the subject.
- Camera Shake: A general blur across the entire image, typically caused by holding the camera unsteadily during the shot.
How Lightroom Can Help Fix These Issues
Lightroom is equipped with several tools that can help you tackle different types of blur:
- Sharpening Tool: This tool enhances the edges in your photo, making details pop and reducing the appearance of blur. It’s your go-to for improving overall sharpness.
- Clarity Slider: The Clarity slider increases mid-tone contrast, bringing out details that might be lost due to blur. It’s especially useful for adding definitions to textures and edges.
- Texture Slider: The Texture slider allows you to enhance or soften the fine details in your photo without affecting the rest of the image. It’s perfect for subtly reducing blur while maintaining a natural look.
- Masking Feature: This feature lets you apply sharpening only to certain areas of your image, helping you focus on specific spots without over-sharpening the rest.
Using the Sharpening Tool
How to Fix Blurry Photos in Lightroom? Sharpening is one of Lightroom’s most effective ways to fix blurry photos. It enhances the edges in your image, making details appear more defined and bringing clarity to areas that may look soft or unfocused. However, sharpening should be applied carefully to avoid unwanted artifacts or a grainy appearance.
Accessing the Sharpening Tool in Lightroom
To access the Sharpening tool, open your photo in the Develop module. Scroll down to the “Detail” panel, where you’ll find the Sharpening section. This panel contains all the controls you need to adjust the sharpness of your photo. By default, Lightroom applies a basic level of sharpening to all images, but you can fine-tune these settings to suit your needs better.
How to Adjust Sharpening Settings for Optimal Results
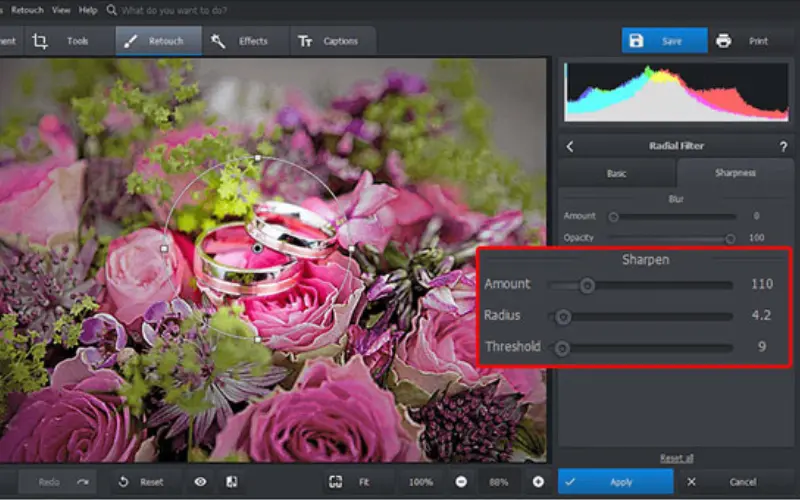
When adjusting the Sharpening settings, there are four key sliders to focus on:
- Amount: Controls the overall strength of the sharpening effect. Start with a low value and gradually increase it until your image looks crisp but not overdone.
- Radius: Determines the area size around each edge that gets sharpened. A smaller radius (around 0.5-1.0) is ideal for detailed images, while a larger radius (2.0-3.0) can be used for images with less fine detail.
- Detail: This slider affects the level of detail enhancement. Higher values enhance smaller details but can also introduce noise. Adjust this slider based on how much texture you want to bring out.
- Masking: This slider helps to protect areas that don’t need sharpening, such as smooth surfaces like skies. Hold the Alt key (Option on Mac) while adjusting the Masking slider to see a black-and-white preview, where white areas represent the parts of the image that will be sharpened.
Knowledge Nugget
According to a survey by Adobe, over 70% of photographers consider image sharpness a top priority when editing their photos, making sharpening tools some of the most frequently used features in photo editing software like Lightroom.
Avoiding Over-Sharpening: Tips and Tricks
Over-sharpening is a common mistake that can lead to unnatural-looking images. To avoid this, keep the following tips in mind:
- Use Masking: As mentioned, the Masking slider is crucial in preventing over-sharpening by targeting only the edges and leaving smooth areas untouched.
- Zoom In: Always zoom in to 100% when adjusting sharpening settings. This lets you see the effect clearly and ensures you don’t go too far.
- Monitor the Noise: Pay attention to the noise level in your photo. Too much sharpening can amplify noise, especially in darker areas, so adjust the Detail slider accordingly.
Enhancing Image Details
Beyond sharpening, Lightroom offers additional tools to bring out details in your images. The Texture and Clarity sliders in the Basic panel are excellent for enhancing details without introducing unwanted artifacts.
Utilizing the Texture and Clarity Sliders
The Texture slider enhances fine details like skin, hair, or fabric. It increases or decreases the prominence of textures in your photo, allowing you to add subtle sharpness without affecting the overall contrast. Use this slider to reveal intricate details without altering the image’s overall look.
The Clarity slider, on the other hand, affects mid-tone contrast. It adds punch to your images by making edges and textures more prominent. Clarity is particularly useful in landscape photography, where it can enhance the depth and drama of your photos.
Difference Between Texture, Clarity, and Sharpening
While Sharpening directly affects the edges of your image, Texture, and Clarity work on a broader level:
- Sharpening: Enhances edges to make the image crisper.
- Texture: Enhances or softens fine details without affecting contrast.
- Clarity: Increases mid-tone contrast, making the image appear more defined and adding depth.
Enhancing Details Without Introducing Noise
One of the challenges of enhancing details is doing so without introducing noise. Here’s how you can manage that:
- Moderate Use of Sliders: Avoid pushing the Texture, Clarity, or Sharpening sliders to their extremes. Subtle adjustments often yield the best results.
- Noise Reduction: Use the Noise Reduction sliders in the Detail panel to counteract any noise introduced during sharpening. Focus on the Luminance slider to reduce grain without losing detail.
- Masking and Local Adjustments: Apply sharpening and detail enhancements selectively using the Masking feature or local adjustment tools like the Radial Filter or Adjustment Brush. This allows you to target areas that need enhancement without affecting the entire image.
Learn How to Smooth Skin in Lightroom Like a Pro

Fixing Motion Blur
How to Fix Blurry Photos in Lightroom? Motion blur occurs when the camera or subject moves during the exposure, resulting in a streaky, blurred effect that can ruin an otherwise great photo. While it’s challenging to eliminate motion blur, Lightroom offers tools and techniques that can significantly reduce its impact. With the right approach, you can salvage photos that might otherwise be discarded due to unwanted blur.
Techniques for Reducing Motion Blur in Lightroom
To reduce motion blur in Lightroom, use the Sharpening tool to enhance the edges of your image. Focus on the Amount and Detail sliders to bring out as much sharpness as possible without introducing noise.
Next, use the Clarity slider to increase mid-tone contrast, which can help make the blurred areas less noticeable. However, be cautious with this slider, as too much clarity can accentuate noise and other artifacts. Adjust slowly and check your image at 100% zoom to ensure you’re not overdoing it.
The Texture slider can be used to subtly enhance fine details for more precise control. This tool is particularly useful when motion blur affects smaller areas, allowing you to recover some of the lost sharpness without affecting the overall look of the image.
Combining Sharpening with the Masking Feature
How to Fix Blurry Photos in Lightroom? One of the most effective ways to handle motion blur is by combining Sharpening with the Masking feature in Lightroom. The Masking slider within the Sharpening section allows you to target specific areas of your photo that need sharpening while protecting the smoother, non-blurred parts of the image.
To use this feature effectively:
- Hold the Alt key (Option key on Mac) while moving the Masking slider. This will show a black-and-white preview, with the white areas representing the parts of the image that will be sharpened.
- Adjust the slider until only the edges and important details are highlighted in white. This ensures you’re sharpening the areas affected by motion blur without over-sharpening the rest of the image.
- Combine this with the Amount and Radius sliders to fine-tune the sharpening effect, bringing back clarity to the blurred sections.
When to Use Other Tools Like Photoshop for Severe Blur
While Lightroom is powerful, there are instances where the blur is too severe to handle effectively. In cases of extreme motion blur, you might need to turn to Photoshop for more advanced correction tools.
Photoshop offers features like Shake Reduction, which is designed to combat camera shake and motion blur. This tool analyzes the blur and applies a correction that can sometimes restore a surprising amount of detail. Additionally, Photoshop provides more granular control over Layer Masks, allowing you to apply sharpening and other adjustments only to the areas that need it most.
If your photo requires this correction level, export the image from Lightroom and open it in Photoshop. After applying the necessary fixes, you can return the photo to Lightroom for final adjustments and exporting.
Did You Ever Wonder?
The Sharpening tool in Lightroom applies what is known as Unsharp Masking, a technique that enhances the contrast along the edges of objects in the image. Despite its name, Unsharp Masking actually sharpens the image by amplifying edge details.
Dealing with Out-of-Focus Blur
Out-of-focus blur occurs when the camera fails to lock onto the subject correctly, leaving the main elements of your photo looking soft or hazy. While this type of blur can be challenging to correct, Lightroom offers tools that can help minimize its impact. By understanding how to use these tools effectively, you can recover some of the lost sharpness and make your image look more focused.
How to Minimize Out-of-Focus Blur Using Lightroom
How to Fix Blurry Photos in Lightroom? When dealing with out-of-focus blur, the first step is to use the Sharpening tool within Lightroom’s Develop module. Start by increasing the Amount slider to boost the overall sharpness of your image. This helps enhance the edges and make the subject appear more defined.
Next, adjust the Radius slider to control how far the sharpening effect will be applied from the edges. A slightly higher radius (around 1.5 to 2.0) for out-of-focus images can help make the subject stand out more. However, be cautious not to overdo it, as this can lead to a halo effect around the edges.
Use the Masking slider to ensure that only the necessary parts of the image are sharpened. This prevents unnecessary sharpening of already smooth areas, which can introduce unwanted noise.
The Role of the Detail Panel in Focus Recovery
The Detail panel in Lightroom is crucial in recovering focus in blurry images. In addition to the Sharpening tool, this panel also includes Noise Reduction controls that help balance the sharpening effect.
After sharpening your image, use the Luminance Noise Reduction slider to smooth out any noise that might have been introduced, especially in darker areas of the photo. The Detail slider under Noise Reduction can help retain important texture while reducing noise, essential to recover focus in a blurred image.
Additionally, the Detail slider in the Sharpening section allows you to fine-tune the sharpening effect by controlling how much of the fine detail in the image is enhanced. For out-of-focus blur, you’ll want to strike a balance that sharpens the subject without exaggerating any imperfections.
Best Practices for Preventing Blur in Future Photos
How to Fix Blurry Photos in Lightroom? Lightroom provides tools to fix blur, prevention is always better. Here are some best practices to avoid blur in future photos:
- Use a Fast Shutter Speed: A faster shutter speed reduces the chance of motion blur and camera shake. This is especially important when shooting moving subjects or in low-light conditions.
- Focus Manually When Necessary: If your camera struggles to autofocus, especially in low light or with low-contrast subjects, switch to manual focus to ensure your subject is sharp.
- Use a Tripod: A stable camera is less likely to produce blurry images. A tripod is essential for long exposures or when shooting in dim conditions.
- Enable Image Stabilization: If your camera or lens has image stabilization, turn it on to help reduce camera shake.
- Check Focus After Taking a Shot: Always review your photos immediately after taking them, especially in critical situations. If something is off, adjust your settings and retake the shot.

Conclusion
How to Fix Blurry Photos in Lightroom? Fixing blurry photos in Lightroom may seem daunting initially, but with the right tools and techniques, you can bring clarity and sharpness back to your images. Whether you’re dealing with motion blur, out-of-focus shots, or need to enhance the details in your photos, Lightroom offers a comprehensive set of features that make the process straightforward and effective. Following the steps outlined in this guide, you’ll be well on your way to transforming those blurry images into crisp, clear memories.
Lightroom is a powerful tool; the more you experiment with its features, the better your editing skills will become. Don’t be afraid to try different settings, use various tools, and even create presets. Each photo is unique, so what works for one might not work for another. By experimenting and adjusting your approach, you’ll develop a keen sense of how to enhance your images best. Remember, the key to mastering Lightroom is practice and exploration.



This work resonates deeply with anyone who has ever paused to consider the mysteries of the human experience. Your words are not just well-chosen — they are chosen with a precision that makes them feel almost sacred. Each paragraph carries the weight of wisdom, but it is delivered in such a way that feels like a conversation with an old friend, one that you know will stay with you long after the pages are turned.
E2bet là nhà cái uy tín hàng đầu Châu Á với
nhiều sản phẩm hấp dẫn như: Cá cược thể thao, đá gà,
casino,… Bạn có thể đăng ký tài khoản dễ dàng và nhanh chóng,