How to Blur Background in Lightroom [Edit Like a Pro]
We’ve all been there—capturing what should be a perfect photo, only to find the background cluttered with distractions that take away from the main subject. It’s frustrating, right? You want that beautiful portrait or stunning product shot to stand out; instead, the background noise pulls the attention away.
In this article, I will show you exactly How to Blur Background in Lightroom, step by step, so your subject gets the spotlight it deserves. By the end, you’ll be able to create photos with that professional, polished look you’ve always wanted—all within the Lightroom app.
| Step | Action | Tools Used | Key Tips |
|---|---|---|---|
| 1 | Import Photo | File > Import | Ensure image is high resolution. |
| 2 | Select Adjustment Brush | Develop > Adjustment Brush | Adjust brush size, feathering, and flow for precision. |
| 3 | Fine-Tune Brush Settings | Right Panel > Brush Settings | Use smaller brush for detailed areas near subject. |
| 4 | Apply Blur Effect | Paint over background | Build blur gradually to avoid an artificial look. |
| 5 | Adjust Blur Intensity | Clarity, Sharpness Sliders | Keep subject sharp by erasing any over-applied blur. |
| 6 | Finalize Edit | Review > Export | Zoom in to check for consistency and natural transitions. |
Importance of Background Blur in Photography
In photography, A well-blurred background directs the viewer’s focus exactly where you want it—on your subject. This technique, often called bokeh, adds depth and a professional touch to your photos. Blurring the background is especially useful in portrait photography, product shots, or any scenario where you want the subject to pop. It eliminates distractions, allowing the subject to shine while the background gently fades away. By mastering this skill in Lightroom, you’ll elevate your photography to a new level, creating images that capture attention and convey emotion and clarity.
Why Blur Backgrounds in Lightroom?
Blurring backgrounds in Lightroom is not just a trend; it’s a powerful technique that can transform your photos from ordinary to extraordinary. Blurring backgrounds allows your subject to stand out while the background fades into a soft, pleasing blur. This feature is particularly useful in various photography genres, including portraits, product photography, and even landscape shots where you want to emphasize a specific element.
Comparison to Other Apps or Tools
Unlike mobile apps with a one-size-fits-all blur effect, Lightroom allows you to control exactly where and how much blur is applied. This means you can create a more natural and tailored effect, ensuring that the blur enhances your image rather than overpowering it. Additionally, Lightroom’s powerful editing tools let you fine-tune other aspects of your photo simultaneously, offering a comprehensive editing experience all in one place. If you’re serious about achieving professional-looking background blur, Lightroom is the tool of choice.
Understanding the Basics of Blurring Backgrounds in Lightroom
How to Blur Background in Lightroom is a technique that requires understanding a few key tools and features within the app. By mastering these, you’ll be able to create images that draw the viewer’s attention exactly where you want it. Let’s dive into the essentials you need to know.

Overview of Lightroom’s Tools and Features
The most important tools for blurring backgrounds are the Adjustment Brush and the Radial Filter. These tools allow you to apply edits selectively, meaning you can choose exactly where you want the blur effect to appear. This level of control ensures that your background blur looks natural and complements the subject rather than detracting from it.
Explanation of Selective Edits Versus Global Edits
In Lightroom, edits can be applied in two main ways: selective and global. Understanding the difference is crucial for effectively blurring backgrounds.
- Global Edits: These edits affect the entire image. For example, increasing the exposure or saturation will impact every part of the photo. Global edits are great for overall adjustments, but they’re not ideal when you want to focus on a specific area, like blurring just the background.
- Selective Edits: This is where Lightroom truly shines for blurring backgrounds. Selective edits allow you to apply changes to only a certain part of the image—such as the background—while leaving the rest of the photo untouched. This means you can blur the background without altering the clarity or detail of the subject, keeping the focus exactly where you want it.
Focus on the Adjustment Brush and Radial Filter
To effectively blur backgrounds in Lightroom, you’ll primarily use the Adjustment Brush and the Radial Filter. Here’s how they work:
- Adjustment Brush: This tool allows you to paint over the areas of the photo where you want to apply specific edits. For example, in the case of blurring backgrounds, you would use the Adjustment Brush to carefully select the background area and then apply the blur effect. The beauty of the Adjustment Brush is its precision; you can fine-tune the brush size, feathering, and flow to ensure a smooth, natural transition between the blurred background and the sharp subject.
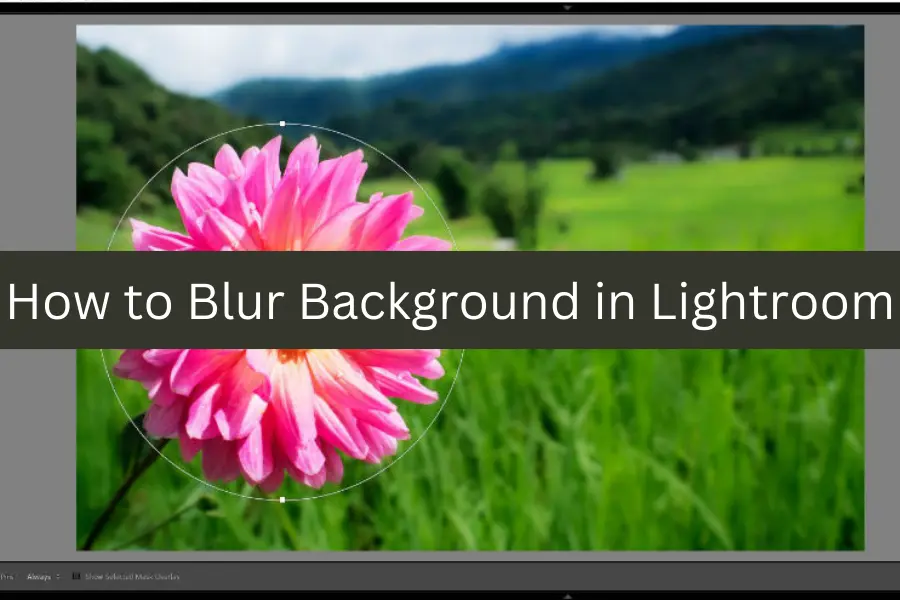
- Radial Filter: The Radial Filter is another powerful tool for creating a blurred background. It works by applying a circular or oval mask over the photo, allowing you to adjust the area inside or outside of the mask. For example, you can place the Radial Filter around your subject and then apply a blur to everything outside the filter. This creates a subtle, vignette-like blur that keeps the focus on your subject while softening the surrounding background.
Knowledge Nugget
Over 90% of professional photographers use background blur (bokeh) to enhance the subject in their photos, making it a key technique for creating high-quality images.
Step-by-Step Guide on How to Blur Background in Lightroom
How to Blur Background in Lightroom is straightforward once you get the hang of it. To help you achieve the best results, here’s a step-by-step guide to walk you through every process detail. Follow these steps carefully, and you can create beautifully blurred backgrounds that make your photos stand out.
Step 1: Importing and Preparing Your Photo
The first step is to import your photo into Lightroom. Whether you use the desktop or mobile version, this process is quick and easy. Simply drag and drop your image into Lightroom or use the import option to bring your photo into the workspace.
Once imported, take a moment to prepare your photo. This means making any necessary global adjustments, such as exposure, contrast, or white balance. Getting these basic edits out of the way ensures that your photo is in its best possible shape before you start focusing on the background blur.
Step 2: Selecting the Adjustment Brush Tool
Now that your photo is prepped, it’s time to select the Adjustment Brush tool. This tool is located in the right-hand panel in the Develop module on the desktop version or in the Edit menu on the mobile app.
When you select the Adjustment Brush, you’ll notice that a range of settings appears, allowing you to customize the brush’s behavior. This tool is your best friend for selectively applying blur to your background without affecting the rest of the image.
Step 3: Fine-Tuning the Brush Settings
With the Adjustment Brush selected, the next step is fine-tuning the brush settings. You’ll want to adjust the brush’s size, feather, flow, and density to suit the area you’re working on.
- Size: Adjust the brush size to match the area you’re blurring. A smaller brush is better for detailed areas, while a larger brush works well for broad, open spaces.
- Feather: The feather setting controls the softness of the brush’s edges. A higher feather value creates a more gradual transition between the blurred and sharp areas, which helps maintain a natural look.
- Flow and Density: These settings control the intensity of the effect. Lowering the flow and density allows you to build up the blur gradually, giving you more control over the final result.
Step 4: Applying the Blur Effect to the Background
You can apply the blur effect to the background with your brush settings dialed in. Carefully paint over the areas you want to blur, avoiding the subject. If you accidentally brush over the subject, don’t worry—Lightroom allows you to erase or refine the area using the Erase tool within the Adjustment Brush settings.
As you apply the blur, the background will start to soften, creating that desirable depth of field effect. Be patient during this step; precision is key to achieving a natural and effective blur.
Step 5: Adjusting the Blur Intensity
Once the blur is applied, you might want to fine-tune the intensity of the effect. Lightroom allows you to adjust the blur after it’s been applied, which ensures that the effect complements your photo rather than overpowering it.
- To adjust the intensity, simply revisit your settings with the Adjustment Brush and tweak the sliders to increase or decrease the blur. You can also use the Clarity or Sharpness sliders in the Adjustment Brush settings to further refine the background blur, adding the right amount of softness to the areas you want.
Step 6: Reviewing and Finalizing the Edit
The final step is to review your work and make any last-minute adjustments. Zoom in and out of your photo to check the blur effect from different perspectives, ensuring it looks natural and consistent. If you’re happy with the result, it’s time to finalize the edit.
Export your image in the desired format, and you’re done! Your photo now has a beautifully blurred background that perfectly highlights your subject, making it look professional and polished.
Advanced Techniques for Background Blur
Once you’ve mastered the basics of blurring backgrounds in Lightroom, it’s time to explore some advanced techniques that can help you achieve even more professional results. These methods will give you greater control over your edits and allow you to easily handle more complex images.
Using Radial Filters for a More Natural Blur
The Radial Filter is an incredibly versatile tool that can help you create a more natural-looking blur. Unlike the Adjustment Brush, which allows you to paint the blur effect directly onto the background, the Radial Filter lets you apply the effect in a circular or oval shape, which can be adjusted to fit around your subject.
- To use the Radial Filter for background blur, simply draw an oval around your subject and then invert the mask to apply the effect outside the selected area. You can then adjust the blur settings to soften the background while keeping your subject sharp and clear. This method is particularly useful for portraits or close-up shots where you want to create a soft, vignette-like blur that draws attention to the center of the image.
The Radial Filter allows a more gradual transition between the blurred background and the sharp subject, resulting in a more natural look. This technique is ideal for achieving a professional depth-of-field effect that mimics the look of a high-end camera lens.
Combining Multiple Tools for Complex Images
When working with more complex images, you may find that using just one tool isn’t enough to achieve the desired effect. Combining the Adjustment Brush, Radial Filter, and even the Gradient Filter can give you greater flexibility and control over your edits.
For example, you might start using the Radial Filter to create a soft blur around your subject, then switch to the Adjustment Brush to fine-tune the blur in specific areas. If your image has a complex background with varying elements, combining these tools allows you to apply the blur more precisely, ensuring the final result looks cohesive and polished.
This approach is especially useful for images where the background varies in distance or detail, allowing you to adjust the blur effect accordingly. By combining multiple tools, you can confidently tackle even the most challenging images.
Quick Fact
The Radial Filter in Lightroom can be adjusted to create an elliptical shape, allowing for a more natural blur that mimics the depth of field seen in DSLR cameras.
Alternative Methods for Blurring Backgrounds in Lightroom
If you’re looking to blur backgrounds in Lightroom but want to explore different methods beyond the traditional tools, several alternatives can offer quick and effective results. These methods are particularly useful if you’re working on mobile, want to use presets for a faster workflow, or are interested in third-party plugins that expand Lightroom’s capabilities.

Comparison with Mobile Lightroom Features
Lightroom’s mobile app is a powerful tool in its own right, offering many of the same features as the desktop version. If you’re editing on the go, the mobile app’s capabilities for blurring backgrounds are quite robust. While the Adjustment Brush and Radial Filter are available, the mobile version simplifies these tools for ease of use on smaller screens.
The mobile app also includes Selective Editing, which allows you to blur backgrounds with just a few taps. While it may not offer the same level of precision as the desktop version, it’s incredibly convenient for quick edits and on-the-fly adjustments. Lightroom mobile provides a seamless experience with enough power to blur backgrounds effectively, making it a great alternative to the desktop version for users who primarily edit on their phones.
Using Presets for Quick Background Blur
Presets in Lightroom are a fantastic way to apply a consistent look to your photos with minimal effort. They can also be used to achieve a quick background blur. Presets are available specifically designed to create a soft, blurred background effect, which can save you time editing a large batch of photos.
- To use a preset for background blur, simply select the preset that best matches your desired effect and apply it to your photo. To create the blur, the preset will automatically adjust the necessary settings, such as clarity and sharpness. While presets are generally designed to work across various images, you can always fine-tune the settings afterward to better match your specific photo.
This method is ideal if you edit multiple images quickly or look for a consistent style across your portfolio. Presets offer a quick and efficient way to blur backgrounds without requiring manual adjustments.
Third-party plugins and Apps That Integrate with Lightroom
Third-party plugins and apps can provide additional features and flexibility for those who want to improve their background blur. Plugins like ON1 Effects or Luminar AI offer advanced tools that can be integrated directly into Lightroom, giving users more control over the blur effect.
- These plugins often include specialized blur filters that can be applied with more nuance and detail than Lightroom’s native tools, allowing for creative effects like motion blur or tilt-shift. If you’re working with complex images or want to experiment with different types of blur, these plugins are worth exploring.
Some third-party mobile apps integrate with Lightroom, enabling you to apply advanced blur effects on your mobile device before exporting the image to Lightroom for further editing. These apps often come with unique filters and settings that can add a professional touch to your photos.
Conclusion
How to Blur Background in Lightroom is a powerful technique that can dramatically enhance your photos by drawing attention to your subject and minimizing distractions. Whether you’re a beginner or an experienced user, mastering this skill is essential for creating professional-quality images. Let’s quickly recap the steps and key points covered in this guide.
While this guide provides a solid foundation for blurring backgrounds in Lightroom, don’t be afraid to experiment with different techniques and tools. Whether using the Radial Filter for a more natural blur, combining multiple tools for complex images, or exploring presets and third-party plugins, there’s plenty of room for creativity. Each photo is unique, and experimenting with various methods can help you discover new ways to enhance your images.

