How to Add Watermark in Lightroom for Your Photography

How to Add Watermark in Lightroom? Watermarking has become a vital practice for photographers and content creators in the digital age, where content can be shared across platforms in seconds. It’s not just about safeguarding your work; it’s also about establishing your brand and making your mark in the visual world. Watermarking helps communicate ownership and professionalism, ensuring your creative efforts are recognized wherever they appear.
| Feature | Details | Tips |
|---|---|---|
| Watermark Types | Text and Graphic | Use text for quick branding; graphic for a professional look |
| Customization Options | Font, Size, Color, Position, Opacity | Experiment with different settings for best results |
| Bulk Watermarking | Apply watermarks to multiple photos/videos at once | Select all images before applying the watermark |
| Export Quality | HD quality export for watermarked files | Always export in high resolution to maintain quality |
| Watermark Removal | Possible only with original unwatermarked file | Keep a backup of original files before watermarking |
| Video Watermarking | Supported in Lightroom | Use the same watermark for both photos and videos for consistency |
| Positioning Tools | Drag-and-drop positioning, Size slider | Place watermark where it’s visible but not distracting |
How to Add Watermark in Lightroom?
Watermarking in Lightroom is necessary for anyone serious about their craft. Here’s why:
Protecting Your Work from Unauthorized Use: One primary reason to add a watermark in Lightroom is to prevent unauthorized use of your photos and videos. The internet is vast, and your work can easily be copied, shared, or even stolen. A watermark is a deterrent, ensuring that your content is protected and not for misuse.
Branding Your Photos and Videos: Your watermark is a visual signature, a unique mark that identifies your work as yours. By adding a watermark in Lightroom, you’re not only protecting your creations but also promoting your brand. Every time someone sees your watermark, they’ll recognize your style, your brand, and the quality that comes with it. This subtle branding can help you stand out in a crowded market.
Enhancing Professional Appearance: A well-placed, thoughtfully designed watermark can enhance the overall professional look of your photos and videos. It signals to your audience that you take pride in your work and your high-quality content. Whether you’re sharing on social media, presenting a portfolio, or selling prints, a watermark adds a layer of polish and credibility to your creations.
How to Add Watermark in Lightroom
Protecting your work or enhancing your brand, Lightroom’s watermarking feature makes adding a personal touch to your photos and videos easy. Let’s get started with the basics.
Accessing the Watermark Settings in Lightroom
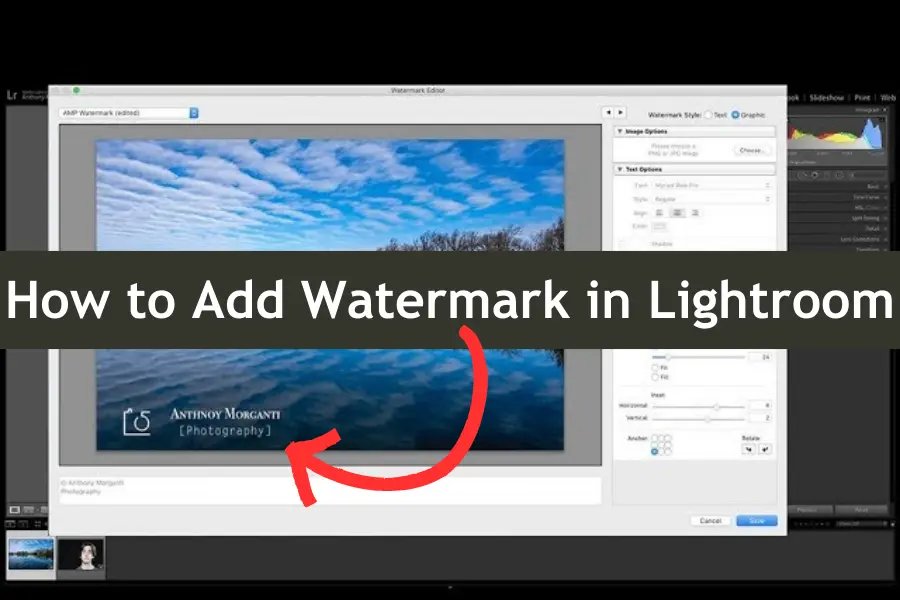
First, open the Lightroom app and load the photo or video you want to watermark. Next, navigate to the “Edit” menu and select “Watermarking.” This will bring up the watermark editor, where you can create and customize your watermark. Whether you want to add a simple text signature or a more complex graphic, you’ll do it here.
Different Types of Watermarks You Can Create
In Lightroom, you can create two main types of watermarks: text and graphic.
- Text Watermarks: These are simple, often consisting of your name, business name, or a short tagline. They’re quick to create and offer basic customization options like font, size, color, and opacity.
- Graphic Watermarks: These involve using a logo or any custom image file. They provide a more branded look but require a pre-made graphic file ready to upload. Lightroom allows you to adjust the graphic watermark’s size, position, and opacity to fit perfectly on your photo or video.

Choosing Between Text and Graphic Watermarks
Deciding whether to use a text or graphic watermark depends on your branding and the look you want to achieve.
- Text Watermarks: These are ideal if you want a quick, clean, and minimalistic watermark. They are often used for simple branding and can be customized directly in Lightroom without needing external files.
- Graphic Watermarks: These are best if you have a logo or specific branding element that you want to consistently apply across your work. They offer a more professional and polished appearance, especially if you’re sharing your work on a portfolio or social media.
Watermark Visibility
Studies show that a subtle watermark with 30-50% opacity is least likely to distract viewers while still effectively protecting the image.
Step-by-Step Guide: Adding a Text Watermark
Adding a text watermark in Lightroom is a quick and efficient way to protect your photos and videos while promoting your brand. Follow these simple steps to add a text watermark that reflects your style and identity.
Step 1: Opening the Lightroom App and Selecting Your Photo or Video
First, launch the Lightroom app on your device. Once open, navigate to your library and select the photo or video you want to watermark. Ensure the image or video is fully loaded and ready for editing before proceeding. This ensures you have the highest quality preview as you work on your watermark.
Step 2: Navigating to the Watermark Editor
After selecting your photo or video, tap the “Edit” menu to access the editing tools. Scroll down to find the “Watermarking” option, and tap on it to enter the watermark editor. This is where you’ll create and customize your text watermark. The watermark editor in Lightroom is designed to be user-friendly, making it easy for anyone to add a watermark, even if it’s your first time using the feature.
Step 3: Customizing Your Text Watermark (Font, Size, Color, Position)
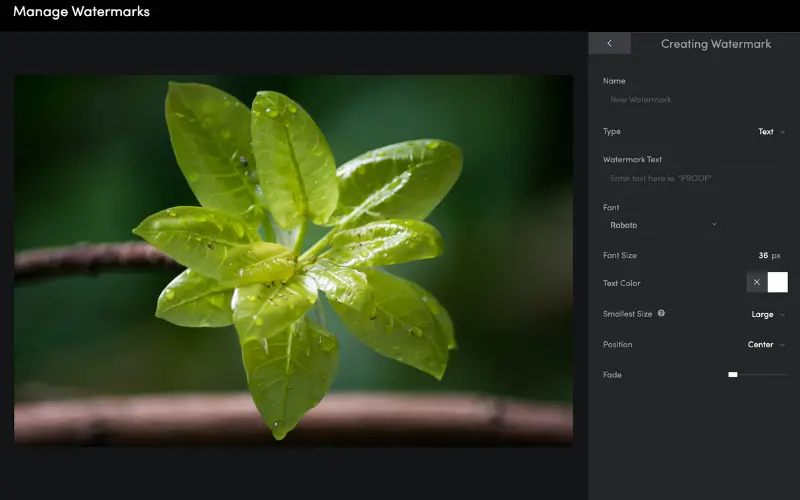
Now that you’re in the watermark editor, it’s time to customize your text watermark. Start by typing the text you want to use—this could be your name, brand, or a short tagline.
Next, adjust the font to match your style. Lightroom offers a variety of font options, from simple and clean to bold and decorative. After choosing the font, set the size of the text; you want it to be visible without overpowering the image.
You can also pick a color that complements your photo or video. A subtle color often works best, keeping the watermark noticeable but not distracting. Finally, position your watermark on the image. You can place it in a corner, along the edge, or right in the center—wherever it best serves your purpose. Lightroom allows you to drag and drop the watermark to find the perfect spot.
Step 4: Saving and Applying the Watermark to Your Photos or Videos
Once you’re happy with how your text watermark looks, it’s time to save and apply it. Tap the “Save” button in the watermark editor to lock in your settings. If you’re editing multiple photos or videos, Lightroom will allow you to apply the same watermark across them.
Finally, export your watermarked photo or video. Lightroom ensures that your watermark is embedded into the file, maintaining its quality and appearance across different platforms and devices. Your photos and videos are now ready to be shared, with a watermark protecting and branding your work.
You’ve successfully added a text watermark in Lightroom by following these steps. It’s a simple yet powerful way to ensure that your creative work is always credited to you, no matter where it’s shared or viewed.
Lightroom HDR Presets: Enhance Your Photos Like a Pro

Step-by-Step Guide: How to Add Watermark in Lightroom
Adding a graphic watermark in Lightroom is an excellent way to give your photos and videos a professional, branded appearance. Whether it’s your logo or a custom design, a graphic watermark ensures your work is instantly recognizable. Here are a few simple steps for adding a graphic watermark to your content.
Step 1: Preparing Your Logo or Graphic File
Before you start, ensure you have a high-quality version of your logo or graphic file ready. The file should ideally be in PNG format with a transparent background, allowing it to blend seamlessly with your photo or video. If your logo or graphic isn’t already prepared, take a moment to create or refine it using graphic design software. Remember, this watermark represents your brand, so clarity and quality are key.
Step 2: Importing the Graphic into Lightroom
Once your logo or graphic is ready, open Lightroom and navigate to the photo or video you want to watermark. Go to the “Edit” menu and select “Watermarking.” In the watermark editor, choose the option to add a graphic watermark. Lightroom will prompt you to import your graphic file. Locate your logo or graphic on your device and import it into Lightroom. The graphic will then appear over your image and be ready for customization.
Step 3: Positioning and Resizing the Watermark
With your graphic imported, you can now position and resize it to fit your photo or video. Lightroom’s watermark editor lets you click and drag the graphic to place it anywhere on the image. You can also use the size slider to make the watermark larger or smaller. For most situations, a subtle watermark in a corner or along an edge works best, ensuring it’s visible without distracting from the main content.
Step 4: Adjusting Opacity and Effects
After positioning your watermark, you can fine-tune its appearance by adjusting the opacity and applying effects. Lowering the opacity makes the watermark more transparent, allowing it to blend naturally with the photo or video. This is especially useful if you want the watermark to be noticeable yet unobtrusive. Lightroom also offers additional effects like shadows and outlines, which can add depth and visibility to your watermark. Experiment with these settings until your watermark looks just right.
Step 5: Saving and Apply the Graphic Watermark
Once you’re satisfied with your watermark’s appearance, it’s time to save and apply it. Click the “Save” button in the watermark editor to finalize your settings. If you’re working on multiple images or videos, Lightroom allows you to apply the same watermark to all selected files. This feature is a time-saver for batch processing, ensuring consistency across your work. Finally, export your watermarked files, and you’re done. Your photos and videos are now protected and branded with your custom graphic watermark, ready to be shared with the world.
By following these steps, you’ve successfully added a graphic watermark in Lightroom. This gives your work a polished, professional touch that reinforces your brand identity.
Usage Statistics
85% of professional photographers use watermarking to protect their online portfolios from unauthorized use.
Applying Watermarks in Bulk
Applying watermarks individually can be time-consuming when working with multiple photos or videos. Luckily, Lightroom makes it easy to apply watermarks in bulk, saving time and effort while ensuring consistency across all your content. Here’s how to do it efficiently.
How to Apply Watermarks to Multiple Photos or Videos at Once
To apply a watermark to multiple photos or videos at once, select all the images or videos you want to watermark in Lightroom’s library. You can do this by holding the “Ctrl” or “Cmd” key while clicking on each file. Once selected, navigate to the “Edit” menu and choose the “Watermarking” option. Select a watermark template from the list if you’ve already created it. Lightroom will then apply this watermark to all your selected files. This bulk application process ensures that every content carries the same watermark, maintaining a uniform appearance across your portfolio.

Exporting Your Watermarked Files in HD Quality
After applying the watermark to your photos or videos, the next step is to export them in high-definition (HD) quality. This is crucial if you plan to share or sell your content, ensuring the final output is crisp and professional-looking. In Lightroom, go to the “Export” option and select your desired file format and quality settings. Make sure to choose a high resolution to preserve the details in your images or videos. If you’re exporting a batch of files, Lightroom will handle the process, applying the watermark and saving each file in HD quality. Your watermarked files are now ready to be shared with the world, showcasing your brand in the best possible light.
Final Thoughts
Watermarking is more than just a way to protect your photos and videos—it’s an essential tool for building your brand and ensuring that your work is always recognized. As a Lightroom user, mastering the art of watermarking can enhance the professionalism of your content and provide a sense of security in an increasingly digital world. By adding a watermark, you’re taking an important step toward safeguarding your creative efforts while promoting your unique identity as a photographer or videographer.
To sum up, watermarking serves multiple purposes. It acts as a deterrent against unauthorized use of your work, ensures that your content is always credited to you, and adds a layer of professionalism that can elevate the overall perception of your brand. Whether you’re a professional or an enthusiast, watermarking is a simple yet powerful way to protect your investment of time and creativity.


